こんにちは!Hoshです!「なんかここの壁寂しいなぁ。ちょっとしたものを飾りたいなぁ、けど高いお金払って失敗するのもやだし。」とお悩みのお方!ダイソーさんのものを使って簡単ウォールデコで解決できるかもしれません。
DIYで日曜大工用品が揃っている方なら、低コストで作れちゃう、おしゃれ飾り棚を紹介していきます。それでは始めます。
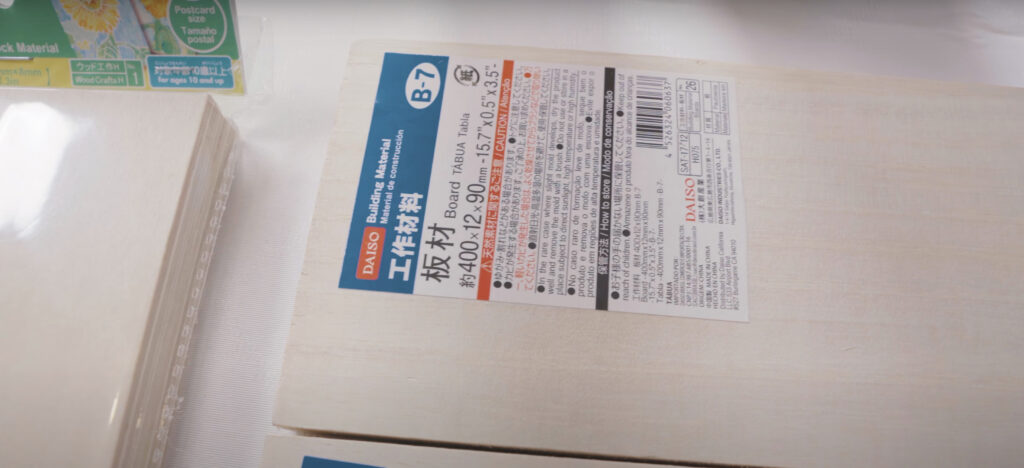
今回使用するもの
![](https://eightinterior.com/wp-content/uploads/2021/06/ca1c77eae455a30d3bea63dff9d28c6e-1024x569.jpg)
上の写真のものにプラス、麻紐と釘とトンカチ、電動スクリュードライバー(穴あけ用)が必要です。
![ダイソー購入品](https://eightinterior.com/wp-content/uploads/2021/06/304804c904cabe448bfd5900eb781a4f-1024x468.jpg)
![](https://eightinterior.com/wp-content/uploads/2021/06/f1c845679f28853b1cf3d8b41a48a51f-1024x662.jpg)
DIY開始、木材のカット
![](https://eightinterior.com/wp-content/uploads/2021/06/4ebab0b6a18233b782d158a5a03dfbc9-1024x502.jpg)
まずは上の写真のように長い方の板からDIYしていきます。長い方の板(長さ40cm)の板を25cmのところに印をして線を引きます。
![](https://eightinterior.com/wp-content/uploads/2021/06/b55b237b8dae6e54556ae23c772ae349-1024x606.jpg)
![](https://eightinterior.com/wp-content/uploads/2021/06/4bfbb2fa3fdcae1500d719e950f5335d-1024x606.jpg)
![](https://eightinterior.com/wp-content/uploads/2021/06/fe7a203eb5ec3c8b42986f8f32bf5cca-1024x486.jpg)
ステインで木材に色付けする
次にステインで好きな色に木板を染めるのですが、そのままの木の色で良い方はステインを塗る必要はありません。※ステインとは木の木目はそのままに色を着色していくこと。油性のステインをオイルステインと呼ぶ。ステインはニスと違って塗布後、木の質感をそのまま出す。ニスは塗布後、薄い膜が貼られる。
![](https://eightinterior.com/wp-content/uploads/2021/06/972416bbb5efe2927735273d1fcf6003-1024x530.jpg)
![](https://eightinterior.com/wp-content/uploads/2021/06/3cf065758e9f7fae721bd5c97521f1ce-1024x521.jpg)
木材をボンドでくっつける
ステインが乾いたら次に木工用ボンドを使います。
![](https://eightinterior.com/wp-content/uploads/2021/06/fe95bb2ac2aa911cbe7d121789be0b10-1024x638.jpg)
![](https://eightinterior.com/wp-content/uploads/2021/06/76066bbf1df6f741cee7062a775ef796-1024x601.jpg)
小さい方の木板も同じように作っていく
ボンドが乾くのを待つ間に、もう一つのハガキサイズの木板も同じようにDIYしていきます。
![](https://eightinterior.com/wp-content/uploads/2021/06/2a0909a2b82ec85cd320f6f0266c9f79-1024x642.jpg)
![](https://eightinterior.com/wp-content/uploads/2021/06/3c85e3c3df5dbb6ebcbcd0d7aaeb39c9-1024x714.jpg)
ニスはステインと違って膜が貼られ木の質感が薄れコーティングされるような印象になります。しかし「つや消し」のものを選べばテカテカとした質感にはなりませんので、僕はつや消しを選んでいます。僕は木の質感を残したいタイプなのでつや消しで薄く塗布していきます。
![](https://eightinterior.com/wp-content/uploads/2021/06/f4dd5bab8b059e6aaa2bea0eb5823f11-1024x745.jpg)
![](https://eightinterior.com/wp-content/uploads/2021/06/b4a7e1177823ad7dd2c6636ded7fb24b-1024x591.jpg)
釘で固定
ボンドが乾いたら、釘を打って固定していきます。
![](https://eightinterior.com/wp-content/uploads/2021/06/eecc78e458164608ce311dd0a2d1cc48-1024x689.jpg)
僕は端、真ん中、端と計3箇所釘で固定しました。
紐を通す穴を開ける
![](https://eightinterior.com/wp-content/uploads/2021/06/78588f13e554f6f5ae04242259a60723-1024x583.jpg)
お気に入りの電動工具ブラックアンドデッカーで穴を開けていきます。
![]() | ブラックアンドデッカー マルチツール プラス 18V EVO183P1 インパクトドライバー・ドリルドライバー・丸ノコ・サンダーのヘッドアタ
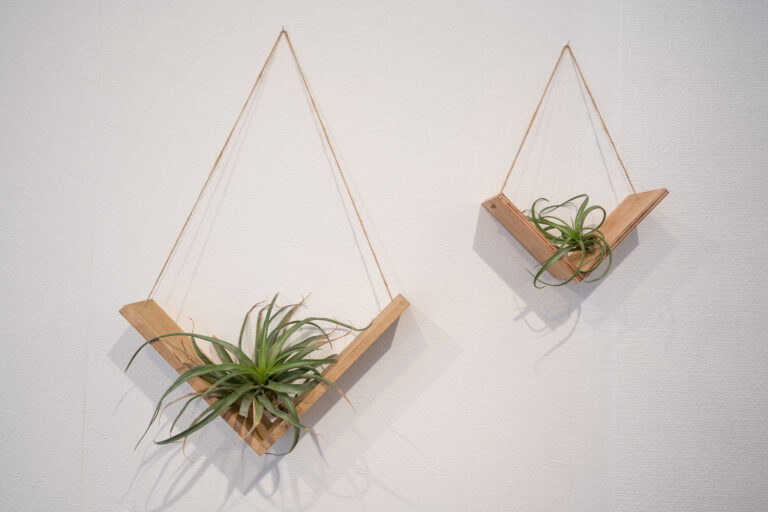
|
![](https://www17.a8.net/0.gif?a8mat=3BQNOC+BB99U+2HOM+BWGDT)
![](https://eightinterior.com/wp-content/uploads/2021/06/c8115545cf8ef411bee039aa71c095a6-1024x567.jpg)
![](https://eightinterior.com/wp-content/uploads/2021/06/cae637683dd28b6ad5a8fb876296cfb7-1024x613.jpg)
![](https://eightinterior.com/wp-content/uploads/2021/06/766dc3e4e4859fc8f2075092bc9611a3-1024x567.jpg)
![](https://eightinterior.com/wp-content/uploads/2021/06/ca8db1ca9458199c46ed679e6a8adf61-1024x615.jpg)
完成
![](https://eightinterior.com/wp-content/uploads/2021/06/A7302015-1024x683.jpg)
![](https://eightinterior.com/wp-content/uploads/2021/06/b179a22e820fbb2b3326902a56ef7737-1024x567.jpg)
壁のデコレーション棚が完成しました。
![](https://eightinterior.com/wp-content/uploads/2021/06/A7302014-1024x683.jpg)
Twitter、インスタグラム、ピンタレスト、YouTubeやってます。フォロー頂けると嬉しいです。
動画版は以下です。