![にほんブログ村 インテリアブログへ](https://b.blogmura.com/interior/88_31.gif)
にほんブログ村
こんにちは!Hoshです!
今回のクッションカバーリメイクは特に自信作です!
その理由は手先の細かいことが苦手な僕がミシン購入をためらっているところに、妻が「最悪、私が使うから。」と後押ししてくれて新しいDIYにチャレンジできたところにあると思います。
つまり妻様様です😆笑 今回のDIYは主に妻がやってくれています。
ミシンを使うのも僕は小学校以来?やったことなかったので、とても助かりました。
ミシン初心者でもできる簡単な縫い方しかしていないので、どなたでもできる内容となっていると思うので、この記事をヒントに自分好みのDIYにチャレンジしてみてください。
今回使用したもの
![](https://eightinterior.com/wp-content/uploads/2021/08/61c3c61e64876f82157f03c0ea66b024-1024x586.jpg)
主に上の写真に写っているものを使いました。
- イケアクッションカバー
- ダイソー毛糸
- ダンボール
- ハサミ
- カッター
- ミシン
- 布用接着剤
- イケアインナークッション
以上となります。
アレンジDIYスタート!
![](https://eightinterior.com/wp-content/uploads/2021/08/138e4849a85ca8c58d6f5ca890d5dc76-1024x961.jpg)
![](https://eightinterior.com/wp-content/uploads/2021/08/994145e3440c8e9ef856da2fc8529e3d-1024x706.jpg)
次に、切ったダンボールに百均で購入した毛糸をグルグル巻いていきます。
![](https://eightinterior.com/wp-content/uploads/2021/08/55b80b3a871913865c3d34346e30412e-1024x558.jpg)
![](https://eightinterior.com/wp-content/uploads/2021/08/ef6266128ff1d5efa54bfd123ddfabc9-1024x611.jpg)
![](https://eightinterior.com/wp-content/uploads/2021/08/5827a7f2cc6b99f43380c3a7b842bee7-1024x650.jpg)
![](https://eightinterior.com/wp-content/uploads/2021/08/d10c51535ce1e6dd95577f2c280f0607-1024x737.jpg)
巻き方のコツは、できるだけキツキツで巻いていくと後の工程がやりやすいです。
ミシンを使う
![](https://eightinterior.com/wp-content/uploads/2021/08/3d69020ab0866c1d5f401c0f94680b2f-1024x606.jpg)
黒のかっこいいデザインを選びました。手先不器用なくせに形はこだわります笑
![]() | ジャノメ ミシン 初心者 電動ミシン! JN508DX-2B JN-508DX-2B フットコントローラー付き ジャノメミシン 本体
|
![](https://www11.a8.net/0.gif?a8mat=3BQNOC+BB99U+2HOM+BWGDT)
![](https://eightinterior.com/wp-content/uploads/2021/08/9460fc504cf1b2c3a44e536ad08b1cdd-1024x534.jpg)
![](https://eightinterior.com/wp-content/uploads/2021/08/2716ff1509c616441b21c60a45f148ea-1024x649.jpg)
縫い終わったので、下の写真のようにハサミで毛糸をカットして段ボールから切り離します。
![](https://eightinterior.com/wp-content/uploads/2021/08/b71288ec885e5efd85607953cd9b1aaa-1024x821.jpg)
![](https://eightinterior.com/wp-content/uploads/2021/08/09cbe7be1c1dd12dc431b5491f17b149-1024x838.jpg)
![](https://eightinterior.com/wp-content/uploads/2021/08/69af80a6b91cd8008f26be459677eb23-1024x812.jpg)
段ボールから切り離すと上の写真のようになりました。これを同じように、あと3つ作ります。
![](https://eightinterior.com/wp-content/uploads/2021/08/8435cfa24ee6c1cdf4242e1b1f0499cd-1024x680.jpg)
![](https://eightinterior.com/wp-content/uploads/2021/08/1fe8bb463de32507d61c86ea8c51f2d2-1024x751.jpg)
クッションカバーに毛糸を付ける
![](https://eightinterior.com/wp-content/uploads/2021/08/8590223c3e925b84b4bda855b526fca4-1024x710.jpg)
上の写真のイケアさんのクッションカバーに、作った毛糸を貼り付けていきます。
![](https://eightinterior.com/wp-content/uploads/2021/08/71b8517b719c5deff9c95b5babffed97-1024x669.jpg)
![](https://eightinterior.com/wp-content/uploads/2021/08/a69d0db8f8e5dbd221349648cb9dfcf5-1024x568.jpg)
![](https://eightinterior.com/wp-content/uploads/2021/08/6505bcc80cdeb0ccf9a9ca937f00eabe-1024x565.jpg)
![](https://eightinterior.com/wp-content/uploads/2021/08/94798666b4b18a180f569bfd7bec1da3-1024x654.jpg)
![](https://eightinterior.com/wp-content/uploads/2021/08/f93cf765aa6a6dfe1035c909737b2168-1024x581.jpg)
![](https://eightinterior.com/wp-content/uploads/2021/08/1d99c1a08c54bc4412a0d064c8e10ed7-1024x606.jpg)
後は下の写真のように重りを乗せて1時間以上乾かします。
![](https://eightinterior.com/wp-content/uploads/2021/08/5321ca9aa9b26894ddc468a868e7d0da-1024x630.jpg)
1時間後、
![](https://eightinterior.com/wp-content/uploads/2021/08/3b26c3846d3faaa26be1850d458c63c8-1024x599.jpg)
縫い目が目立つので、くちゃくちゃっとして毛糸で隠します。
![](https://eightinterior.com/wp-content/uploads/2021/08/cd20a3bf8e25c9f87797f754f3f20c47-1024x649.jpg)
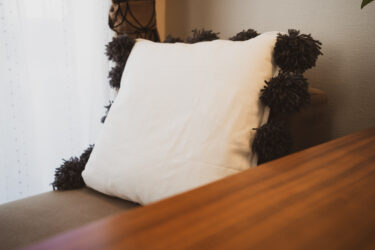
最後に下の写真のイケアさんのインナークッションを差し込んで完成です。
![](https://eightinterior.com/wp-content/uploads/2021/08/a47002c760a109d061d4b34d6475f067-1024x593.jpg)
完成!
![](https://eightinterior.com/wp-content/uploads/2021/08/A7302434-1024x683.jpg)
![](https://eightinterior.com/wp-content/uploads/2021/08/A7302443-1024x683.jpg)
![](https://eightinterior.com/wp-content/uploads/2021/08/A7302436-1024x683.jpg)
良い感じにできました!気に入ってます😆
ツイッター、インスタグラム、ピンタレスト、YouTubeやってます。フォロー頂けると嬉しいです。